Original Website: No link/just picture
Original Pinned Picture:
My Pictures:
Description: There were no instructions with this pin so I got some ideas from other pins and then just went with it. But, if you want to make this yourself here is what I did....
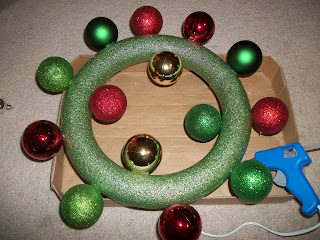
Materials: styrofoam wreath, ornaments, glue gun, wooden initial, paint & paint brush (and maybe a Christmas movie to watch while working)
Step #1: Paint your initial first so that it is dry when you're ready to glue it onto your wreath.
Step #2: I started with a mixture of colors and put them sporadically around the outside edge and inside edge.
Step #3: Then just pick a spot and start filling in. You will want to make sure you have at least 2 or 3 different sizes of ornaments so you can fill in holes.
Step #4: Decide where you want the top to be, and be sure to thread a ribbon around the styrofoam wreath at that point. This will be used to hang the wreath by. After you thread it around then you can hot glue more ornaments on top of it to secure it in place.
Step #5: Keep adding ornaments till you are satisfied. Then, hot glue your wooden initial in the center.
Step #6: Finally, tie your ribbon in a bow and hang it on the door for all to see!!!
How did it go? I put my wreath together in just a couple of hours while watching "It's a Wonderful Life". I had a lot of fun. The only problem that I've had is that the day after I hung my wreath on the front door we had a lot of precipitation and the wooden letter fell off. Between the cold temperature and the wet weather the hot glue didn't stay stuck to the letter. All of the ornaments were fine, it was just the wooden letter that fell off. So, if you have the same problem it might be best to hang yours inside or super glue the wooden letter to the ornaments. Hope you have fun crafting!! Merry Christmas friends!


No comments:
Post a Comment